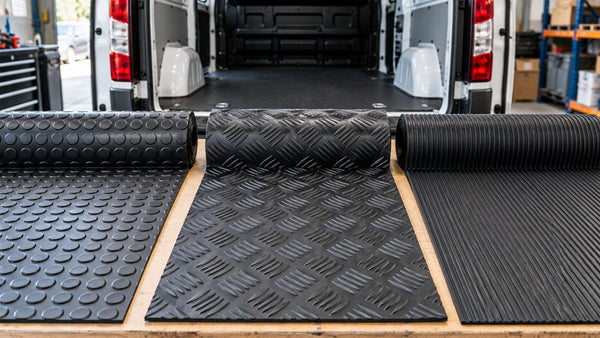
Choosing rubber flooring for a van starts with three questions: what happens on the floor each day, what condition is the existing floor in, and which product specifications meet those needs? A finish that looks right in a photograph may have the wrong width for your van or create an awkward edge at the doors.
Use these answers to narrow down Tuda Van Lining’s rubber flooring range. Then measure the floor before choosing a length. This guide takes you through each check so you can compare products without relying on the pattern alone.
Consider How You Use Your Van
Write down what the van carries, how often you load it, and what reaches the floor. Those details give you a more useful starting point than choosing a pattern first.
|
If You Use the Van for…. |
Ask Yourself… |
Look For in the Product Details… |
|
Daily trade work |
Do tool cases, ladders or wheeled equipment repeatedly cross the same area? |
Suitability for the intended use, particularly around loading areas and edges |
|
A camper conversion |
Will you regularly stand on the floor, and how will it meet cabinets and trim? |
A finish you like in the van, suitable dimensions and a workable edge detail |
|
Occasional transport |
Is wear limited to one loading area? |
Whether full coverage is necessary or a suitable local covering will do |
A plumber moving tool cases in and out each day may focus on wear at the rear doors and cleaning up site dirt. A weekend campervan owner may care more about the visible finish and how neatly it meets the furniture. Neither example establishes that a particular flooring product is suitable: use it to form questions for the product listing or supplier.
Inspect the floor already in the van, too. If plywood is loose, damp or damaged, covering it will hide the problem rather than resolve it.
Choose the Right Rubber Flooring Thickness
Choose a product intended for your application, then check how its thickness works with the existing floor, door clearance and edges. Thickness on its own does not tell you how well a covering will withstand concentrated loads.
For example, laying a covering over plywood raises the finished floor at the rear and side doors. Check whether the new edge will catch cases as they are loaded, interfere with trim, or need a suitable finishing detail. If two pieces must meet, consider the height and position of that join as well.
Before ordering, check:
-
The thickness of the exact variant you want, rather than another option on the same page.
-
Whether you are fitting over sound plywood or another substrate.
-
Clearance at doors, steps, seat fittings and access panels.
-
Any product guidance for the loads and use you expect.
Tuda’s Black Coin listing describes 3 mm and 5 mm options, while its linked 5 bar checker and ribbed listings describe 3 mm products. Confirm the selected variant and its specification before buying; a thicker option is not automatically the better one for heavy equipment.
Compare Coin, Checker Plate and Ribbed Finishes
Coin, checker plate and ribbed describe the visible surface pattern. The pattern affects how the floor looks and feels, but it does not establish a slip rating, material composition or service life.
|
Option from Tuda |
What to Compare in Person |
What to Confirm Before Ordering |
|
The scale of the raised circles and how the finish looks beside your van’s lining |
Your chosen thickness, width and length |
|
|
The more prominent 5 bar checker design shown in this specific listing |
The exact product dimensions and intended application |
|
|
The direction of the ribs in relation to the doors and the look you want |
Dimensions, material details and fitting guidance |
Tuda’s linked listings describe these black products as 1.5 m wide. That is useful for an initial layout, but check the dimensions of the variant you select. The wider Tuda range also includes products described as rubber/PVC, so do not assume every coin or checker option has the same material or specification.
A sample lets you compare the scale and feel of each finish inside the van. For a work vehicle, look at whether the texture is practical for the dirt you commonly bring in. For a camper, view it next to the cabinets and lining in daylight and with the doors closed.
Check the Grip and Slip Resistance
A textured surface may feel different underfoot, but you need evidence for the exact product and conditions before relying on a slip-resistance claim. Ask what testing, if any, applies to the flooring you are considering.
Think about the floor in its normal state and on a wet day. Will people step in with wet boots? Could grit, dust or spilt liquid remain on the surface? Ask whether any available test information covers the conditions that matter to you, and follow the supplier’s cleaning guidance. A product name containing “non slip” is not a substitute for a relevant test result.
Grip underfoot and cargo security are separate issues. Do not rely on the flooring pattern to keep tools or equipment in place; use the vehicle’s appropriate restraints and keep access to fixing points in the floor.
Look for Sufficient Durability
Match the product to the wear your van actually sees. Frequent loading, grit under cases and contact at the rear threshold may matter more than the appearance of an untouched sample.
Walk through a typical loading job. Are cases lifted into place or dragged? Do equipment wheels cross the same strip of floor? Is the rear edge struck each time something heavy is loaded? These questions identify the areas where you should ask for product-specific wear or application guidance.
Protecting the covering also depends on how you use it. Clear grit that could be trapped beneath moving cases, address sharp edges on equipment and inspect high-wear areas. If only one area is repeatedly damaged, consider whether a covering that can be accessed or replaced locally fits your layout. Do not assume a stated thickness guarantees resistance to impacts or abrasion without supporting information.
Consider Water and Chemical Resistance
List the liquids likely to reach the floor, then check compatibility with the precise product and the completed installation. A material’s resistance to a spill does not mean liquid cannot pass through an edge or join.
Wet equipment or boots may leave water near doors and wheel arches. A tradesperson might also carry oils or cleaning solutions. Identify those substances when asking for care and compatibility advice rather than assuming that all rubber flooring tolerates them. Remove spills promptly according to the product guidance.
Pay attention to what happens underneath. If moisture gets past an edge, a neat-looking covering can conceal a damp substrate. Plan how you will inspect the floor, especially where an existing plywood base has already been exposed to water.
Choose Flooring That Is Easy to Clean
Consider how you will remove the dirt you actually bring into the van and how you will check the floor beneath the covering. “Easy to clean” means something different for fine sawdust, gritty mud and an occasional spill.
For a dusty work van, first remove loose debris so grit is not rubbed across the surface during cleaning. Look at the grooves or raised pattern on a sample: could the debris from your jobs collect there, and can you reach it easily? Check joins and edges too, because dirt can gather where a mop or cloth does not reach.
Before using a detergent, solvent or cleaning machine, obtain the care instructions for the shortlisted product. If the fitting method allows the floor to be lifted, establish how it should be removed and refitted. Do not assume a covering can be washed in place without considering water getting beneath it.
Measure the Van Floor Accurately
Measure the full floor shape, including its widest points and interruptions, before deciding what length to order. One length multiplied by one width can miss the way a van narrows between wheel arches or widens near a door.
-
Sketch the floor from above. Mark the bulkhead, rear and side doors, wheel arches, steps, access panels and fixing points.
-
Measure the length at several positions. Record any difference caused by the floor shape or the finish you intend at each end.
-
Measure width at several positions. Include the widest area and the narrower section between the wheel arches.
-
Mark anything that needs access. Tie-down points and removable panels need a planned cut-out or fitting detail.
-
Compare the sketch with the selected roll width. Work out whether one piece can cover your intended area and, if not, where a join could sit.
-
Allow material for trimming. Make that allowance from your template and proposed cutting layout rather than applying a universal waste percentage.
Example measuring sketch (not to scale):

For example, a floor may be wider behind the bulkhead than between the arches. Buying solely from the narrower measurement could leave you short of material even though your length is correct. Recheck your figures against the chosen product’s width and available length before placing the order.
Decide Between a Full Floor and Individual Mats
Choose full coverage when the whole floor needs a finished wear surface. Consider local mats or cut pieces when protection is needed in a defined area and a suitable product and fitting method are available.
A full floor gives you one planned layout, but you must resolve edges, fixing-point access and any joins across the entire area. If wear is concentrated at the rear loading zone, local protection may require less material and make that section easier to inspect or change. Check that its edges will not create an unwanted trip or loading obstruction.
A loose piece also needs particular care: assess whether it might shift in use. Do not assume its weight or surface texture will hold it in place, and never treat it as a cargo restraint. Confirm that the supplier can provide a suitable cut length for the local area you have measured.
Consider How the Flooring Will Be Installed
Check the substrate, approved fitting method, edge finish and access requirements before purchasing. They determine whether the product you like can be fitted neatly in your van.
Lift or inspect the existing floor where practical. Address loose panels, damage and damp before covering them. Then decide whether you can template the shape, how you will cut around wheel arches, and where any joins should fall. Check door movement and clearance with the proposed finished height.
If adhesive or another fixing method is required, obtain instructions for that product and substrate. Bare metal and existing plywood may call for different preparation; do not assume the same approach suits both. Follow the relevant instructions for surface condition, application and curing instead of guessing quantities or times.
Finally, plan access to tie-down points and panels you may need later. A clean-looking continuous sheet is of little use if it blocks an essential fixing point or prevents an inspection.
Check the Weight of the Flooring
Calculate added weight from the actual product and quantity you intend to fit, including any base layers. A floor covering is one part of the van’s total load alongside plywood, racking, tools and passengers.
Use verified figures to fill in the calculation:
Flooring weight = product weight per square metre × square metres fitted
If a supplier provides weight per running metre instead, use the corresponding roll width and ordered length, and check whether its figure includes anything besides the flooring. Add the weight of plywood, adhesive or other components separately where relevant.
Compare the resulting total with the vehicle’s payload information and your expected working load. This is particularly useful for a conversion that also includes furniture or a trade van with racking. If the product listing does not give a usable weight, ask Tuda before treating it as negligible.
Compare Cost With Long-Term Value
Compare the cost of the whole fitted floor, including the quantity required, any joins, fitting supplies and preparation of the existing base. The displayed unit price alone cannot show which option costs less for your particular layout.
Use this final checklist for each shortlisted product:
-
Does the specified material and intended use suit the van?
-
What thickness, roll width and length are available for the exact variant?
-
Will the layout need a join, and where would it go?
-
What extra material does your cutting plan require?
-
What substrate preparation and fitting supplies are specified?
-
Can you inspect or replace an area that may wear first?
-
What is the product’s verified weight for the amount you need?
A wider covering might avoid a join in one van, but that depends on the van measurements, roll orientation and product price. Check the complete cutting plan before comparing totals.
Once you have your measurements and requirements, use Tuda’s rubber flooring samples to compare finishes in the van. Choose the matching full product only after confirming its current specification and the fitting guidance you need.