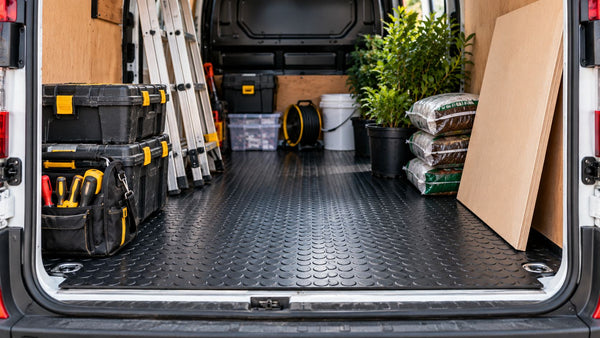
To protect a van floor from tools and heavy equipment, start with the damage you need to prevent. A floor covering can take the wear from repeated loading. A sound base or local liner can protect vulnerable contact points. Storage and restraints stop equipment moving, while cleaning and inspections help you spot damage before it spreads.
No single layer does every job. A textured floor, for example, may be worth considering for a busy loading area, but it cannot secure a heavy machine during a journey. Work through the van from the original floor upwards, then consider how you load it each day.
Install Heavy-Duty Rubber Flooring
Rubber flooring can provide a replaceable wear surface over a working van floor. Whether it suits your van depends on the product, the floor beneath it, how you fit it and what you carry.
Think about a plumber sliding tool cases in and out through the rear doors several times a day. The repeated contact is likely to affect the loading area first. Covering that area, or the full floor, may help protect the surface underneath from everyday scuffs and abrasion. It does not remove the need to secure the cases for travel.
Before choosing rubber flooring, check:
-
The floor underneath: Look for loose boards, damaged edges, exposed metal and damp areas. Address problems before covering them.
-
The usable shape: Measure the floor at several points, including between and around the wheel arches. Mark door openings, thresholds, racking feet and fixing points on a simple sketch.
-
The loading pattern: Identify where cases are dragged, where equipment rests and whether you need to lift the covering to inspect or clean beneath it.
-
The product specification: Check its material, width, thickness, intended application, care instructions and fitting guidance. Do not assume every product in a flooring range has the same composition.
-
The finished edges: Plan cuts around fixing points so they remain usable. Check that edges at the rear and side doors will sit securely and will not catch during loading.
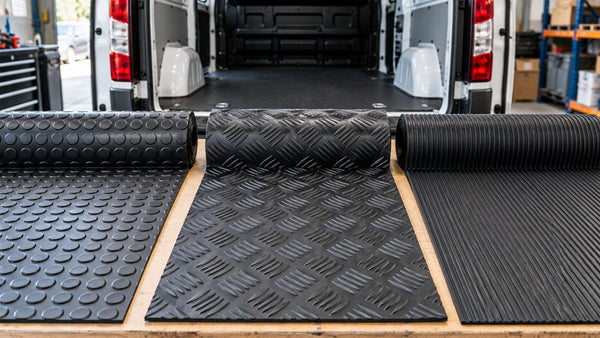
Tuda’s non-slip checker rubber flooring is one checker-pattern option to assess for a van floor. Its product listing describes it for van floors, but the name and pattern alone do not establish a tested slip rating or prove suitability beneath a particular heavy item. Check the current specification and ask Tuda about your intended fitting surface and use before ordering.
If you are comparing patterns, rubber flooring samples can help you judge the finish and texture in person. A sample helps with that choice; it cannot demonstrate how a whole floor will perform under your equipment.
Fit a Protective Plywood Floor
A correctly fitted plywood floor can provide a more even base in a work van. A separate covering can then take everyday surface wear, while the plywood forms part of the floor beneath it.
Start by inspecting the original floor. If the van has a bare metal floor with raised ribs, check its condition and establish how a board floor should be supported and fixed for that vehicle. Do not use plywood to hide corrosion, damage or an unexplained damp patch.
Next, make a floor template or measure carefully around wheel arches, door openings and existing fittings. Plan for access to approved fixing points before cutting the board. Finish exposed edges and check the doors and threshold still work as intended. Any covering fitted above the plywood also needs an appropriate fitting method for that surface.
There is no board thickness or fixing pattern that suits every van and load. Check the vehicle guidance and the specifications of the board, fixings and chosen floor covering. Where a particular installation is unclear, get advice from a competent van fitter. A solid base helps with the floor structure; its top surface may still need protection from repeated loading.
Use Load-Rated Van Floor Mats

A removable mat can protect a specific high-wear area, such as the rear threshold. If a mat is described as load-rated, check what its documented rating means and whether it applies to your intended use.
A mat that looks thick is not automatically suitable beneath a heavy machine or a tool chest on narrow feet. Ask the supplier for the relevant product information rather than judging capacity by appearance. Check the mat’s size, intended surface and how its edges will behave when equipment passes over them.
Removable protection may be useful where you need to lift it for cleaning or inspection. It must still fit securely in normal use: a mat that curls, bunches or shifts at the rear doors could create another problem. Keep any vehicle fixing points accessible.
A mat protects the area it covers. It does not increase the van’s permitted payload, strengthen an unsuitable floor or restrain the equipment standing on it.
Secure Tools With Racking and Storage Systems
Suitable racking gives frequently used tools a defined place and reduces the number of loose cases that can repeatedly strike or scrape the floor. It also makes it easier to see what still needs securing before you drive.
If tool cases slide towards the side of the van on every journey, start by deciding where they should be stored. Shelves, drawers or compartments need to suit the size and weight of their contents, and they must be installed in line with the system and vehicle instructions. Put heavier items where the approved setup allows them to be stored safely and keep everyday tools easy to reach.
Account for the weight of the racking itself when planning the van’s load. Check that drawers and doors close properly, and avoid leaving loose items on top of units. Racking organises and contains tools; it does not automatically make a heavy item safe if the unit or its contents can move in transit.
Use Tie-Down Points to Stop Equipment Moving
Large or heavy equipment needs a suitable restraint system attached to fixing points approved for the vehicle and load. Flooring texture or a close fit against a tool case cannot be relied upon to do that job.
Before fitting a new floor, locate every fixing point you use. Plan cuts so the finished flooring does not cover them or interfere with straps and other restraints. Check the vehicle handbook and the instructions for the restraint equipment when selecting a method, then inspect the equipment for damage before use.
For example, if you occasionally carry a heavy machine, plan its position and restraint before loading it. Consider what could happen during braking or a change of direction, not just whether it stays still while parked. The Driver and Vehicle Standards Agency advises van users to secure large or heavy items to the vehicle and to group smaller items in boxes or containers where possible.
Add Protective Liners Beneath Heavy Equipment
A local liner can protect a particular contact area from repeated abrasion. It is useful to consider when the same item sits in the same place every day, but the item must still be secured appropriately.
Look closely at how the equipment meets the floor. A tool chest with small feet creates different contact points from a broad, flat case. Choose any liner based on the product’s stated application and the equipment you carry; do not assume a loose offcut has a documented weight-bearing capacity.
Check that the liner cannot bunch up or move during loading. It should be possible to inspect the floor beneath it, especially if wet equipment or muddy tools are common. A local liner addresses wear at one spot, while a full covering deals with wider areas of routine traffic.
Distribute Heavy Loads Across the Van Floor
Plan the position of heavy equipment using the vehicle manufacturer’s payload and load-position guidance. Spreading contact over an appropriate base may help protect a floor surface, but it does not increase the vehicle’s weight limits.
Imagine a machine whose weight rests on four small feet. Those contact points deserve attention when you assess the floor and choose a suitable base or protection. Any support must be appropriate for the machine and must not make it unstable or obstruct its restraints.
Consider the full setup: the machine, racking, tools, flooring, boards and other cargo all add weight. Check the vehicle’s permitted payload and axle limits, as well as guidance on where the load should sit. The government’s van guidance advises loading goods evenly through the cargo area, placing heavier items at the bottom and using appropriate restraints.
Use Toolboxes and Containers With Non-Slip Bases
Containers can keep small tools and parts together, and a suitable base may reduce everyday shifting within a storage area. The base alone does not guarantee that a box will stay in place while driving.
Choose boxes that fit their intended shelf, drawer or compartment. Check their bases for wear and keep grit from building up underneath: debris caught between a box and the floor can abrade both surfaces as the box is handled.
If parts boxes are sitting loose in an otherwise empty cargo area, organise and secure them before relying on the texture of either the container or the flooring. Also think about lifting. A box that becomes too heavy to move comfortably can lead to dragging across the van floor.
Clean Up Dirt, Water and Chemical Spills Quickly
Sweep away grit and deal with spills promptly. Then check whether moisture or residue has reached beneath a mat, liner or floor covering.
Mud around the rear doors can dry into abrasive debris where cases are repeatedly loaded. Clear that area regularly, paying attention to threshold edges and corners. If water has entered beneath removable protection, lift it when safe to do so, clean and dry the affected area, and look for damage before putting it back.
For a chemical spill, follow the substance’s safety information and the flooring manufacturer’s cleaning instructions. Do not assume a van floor covering resists every chemical or that a strong cleaning product is suitable for its surface. If liquid repeatedly reaches the floor underneath, find its source rather than repeatedly cleaning only the visible surface.
Inspect and Repair the Van Floor Regularly
Check the areas that take the most use, including the rear threshold, door edges and the floor beneath frequently loaded equipment. Lift removable protection periodically so hidden wear or moisture does not go unnoticed.
A useful routine is to check for:
-
Loose, lifted or damaged covering at loading edges
-
Cuts and wear around fixing points
-
Grit trapped beneath mats and liners
-
Damp patches, staining or exposed metal
-
Loose plywood edges or fittings
-
Tool storage or restraints that have become damaged or insecure
If a rear edge starts lifting, address it before repeated loading makes the damage worse. Check the cause, including the condition of the surface beneath it, before replacing the covering. Refer significant floor damage, corrosion or concerns about the vehicle structure to an appropriate professional.
The best way to protect a van floor is to make each measure do its own job. Choose a covering for the wear you actually see, prepare the floor beneath it, protect concentrated contact points where needed and secure equipment independently. If a new covering is part of your plan, compare Tuda’s flooring finishes and check the product specifications against your measurements before ordering.